There’s something irresistible about that first bite into a crispy taco shell filled with seasoned ground beef, where the crunch gives way to savory, spiced meat and fresh toppings. These Crispy Ground Beef Tacos bring back memories of family taco nights but with flavors that are anything but basic. They strike that perfect balance between nostalgic comfort food and a meal worth getting excited about.
Ready in just 45 minutes, these tacos feature perfectly seasoned ground beef tucked into shells that crisp up beautifully in the oven. The contrast between the warm, spiced filling and cool, fresh toppings creates a taste experience that will have everyone reaching for seconds.
Why You’ll Love This
- The shells get perfectly crispy in the oven, avoiding the soggy bottoms that often plague homemade tacos
- The beef filling is seasoned with a balanced blend of spices that delivers authentic flavor without being too spicy for kids
- Prep most components ahead of time for an easy weeknight dinner assembly
- Customize with your favorite toppings to please everyone at the table
- Leftover filling is delicious in quesadillas, taco salads, or breakfast burritos the next day

Ingredients
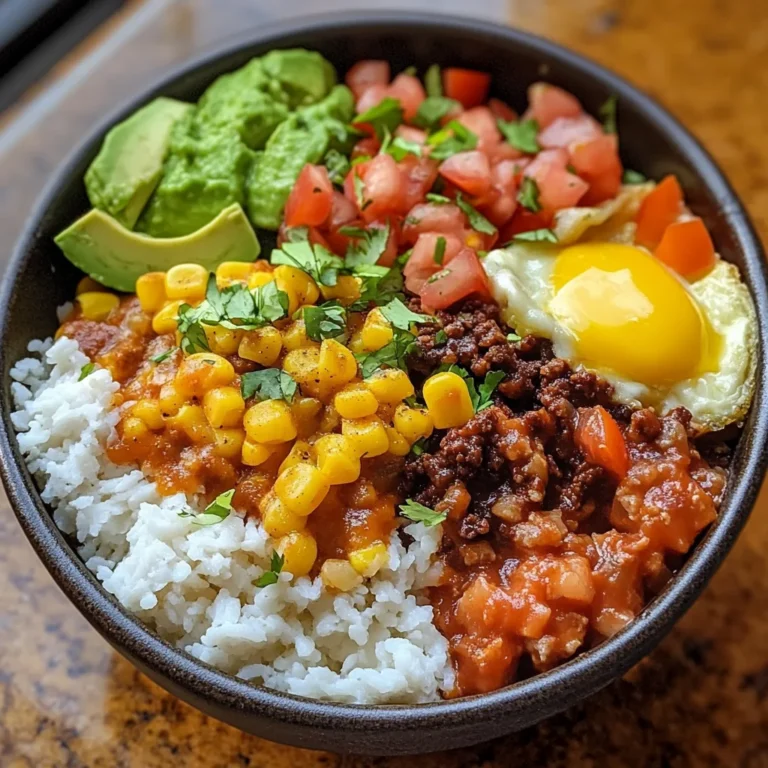
- 1 pound lean ground beef (90% lean)
- 1 packet taco seasoning (about 2 tablespoons)
- 3/4 cup red enchilada sauce
- 10 corn tortillas
- 2 1/2 cups Oaxaca cheese, shredded (or Mexican cheese blend or Monterey Jack)
- 1 tablespoon olive oil, for brushing
- Salsa (for dipping)
- Queso dip (for dipping)
- Guacamole (for dipping)
- Sour cream
- Shredded lettuce
- Diced tomatoes
- Sliced jalapeños
Instructions
- Set your oven to 450°F (230°C) and allow it to fully preheat. This high temperature is key to achieving the perfect crispy exterior on your tacos while maintaining a melty interior.
- Heat a large skillet over medium-high heat. Add the ground beef to the hot skillet and cook, breaking it up with a wooden spoon or spatula as it browns. Continue cooking until the beef is fully browned and no pink remains, about 5-7 minutes. If using beef with a higher fat content, you may want to drain excess grease before continuing.
- Once the beef is browned, sprinkle the taco seasoning evenly over the meat and stir to combine. Pour in the red enchilada sauce and mix well. Bring the mixture to a simmer, then reduce the heat to low and cook for an additional 2-3 minutes to allow the flavors to meld together. Remove the skillet from the heat and set aside.
- Stack the corn tortillas and wrap them in a clean, damp paper towel. Place them in the microwave and heat for 30-60 seconds until they are warm and pliable. This step is crucial for preventing the tortillas from cracking when you fold them. Work with one tortilla at a time, keeping the rest wrapped to stay warm and flexible.
- Choose a nonstick or ceramic baking sheet for best results. Avoid using aluminum foil as the tortillas may stick to it, making it difficult to remove the tacos after baking. If you don’t have a nonstick baking sheet, lightly coat a regular baking sheet with cooking spray.
- Take one warmed tortilla and brush one side lightly with olive oil. Place the tortilla on the baking sheet with the oiled side down. On one half of the tortilla, sprinkle about 2 tablespoons of the shredded cheese. Top the cheese with approximately 1/4 cup of the seasoned beef mixture. Add another 2 tablespoons of cheese on top of the beef. The cheese on both the bottom and top will melt and help hold the taco together.
- Carefully fold the empty half of the tortilla over the filling to create a half-moon shape. Gently press down to help it stay closed. If the tortilla cracks or doesn’t stay folded, you can secure it with a toothpick. Just remember to remove the toothpicks before serving. Repeat this process with the remaining tortillas, arranging the assembled tacos in a single layer on your baking sheet with a small space between each one.
- Place the baking sheet with the assembled tacos in the preheated oven. Bake for 16 minutes, or until the tortillas turn golden brown and crispy around the edges, and the cheese inside is completely melted. Keep an eye on them during the last few minutes to prevent over-browning.
- Once baked, remove the tacos from the oven and let them cool on the baking sheet for about 3 minutes. This brief cooling period allows the cheese to set slightly, making the tacos easier to handle and less likely to fall apart when picked up. It also prevents burning your mouth on the very hot filling.
- Transfer the crispy tacos to a serving plate and serve with small bowls of salsa, queso dip, guacamole, and/or sour cream for dipping. These tacos are best enjoyed immediately while still warm and crispy, but they’re also delicious at room temperature for a party spread.
Tips & Variations
- For extra flavor, toast your taco shells for 2-3 minutes before filling them
- Make your own taco seasoning by combining 1 tablespoon chili powder, 1 teaspoon each of cumin and paprika, and 1/2 teaspoon each of garlic powder, onion powder, oregano, and salt
- Substitute ground turkey or chicken for a lighter option, just add an extra tablespoon of oil to keep it moist
- For a spicier version, add a diced jalapeño with the onions or mix in a teaspoon of chipotle powder
- Prep all toppings and cook the beef mixture up to a day ahead, then just assemble and bake when ready to eat
- Try adding a layer of refried beans to the bottom of each shell before the beef for extra flavor and protein
Serving Suggestions
These crispy tacos pair perfectly with Mexican-style rice and refried or black beans for a complete meal. Set up a toppings bar with additional options like pickled jalapeños, diced red onion, different cheeses, and a variety of salsas (from mild to spicy) so everyone can customize their tacos.
For drinks, serve with ice-cold Mexican beer, margaritas for the adults, or a refreshing agua fresca for a non-alcoholic option. Don’t forget the hot sauce on the table for heat-seekers!
Notes
- Store leftover beef filling in an airtight container in the refrigerator for up to 3 days
- The beef is done when most of the liquid has evaporated and the mixture is moist but not soupy
- To avoid soggy tacos, don’t overfill the shells with wet ingredients
- For make-ahead prep, keep all components separate until ready to assemble and serve
FAQs
Can I make these tacos with corn tortillas instead of hard shells?
Absolutely! You can use corn tortillas that you fry yourself or warm and fold over a rack in the oven to create a crispy shell.
How can I make this recipe gluten-free?
Most hard taco shells are naturally gluten-free, but always check the packaging. Make sure your taco seasoning is gluten-free or make your own, and verify that your beef broth doesn’t contain gluten.
Can I freeze the taco meat?
Yes! The seasoned beef freezes beautifully for up to 3 months. Thaw overnight in the refrigerator and reheat in a skillet with a splash of water or broth.
What’s the best way to keep the tacos from falling over while filling them?
Use a muffin tin to hold the taco shells upright while filling them. Alternatively, fold a piece of aluminum foil into a “snake” and create a zigzag pattern on your baking sheet to nestle the tacos between the folds.
[recipe_card]