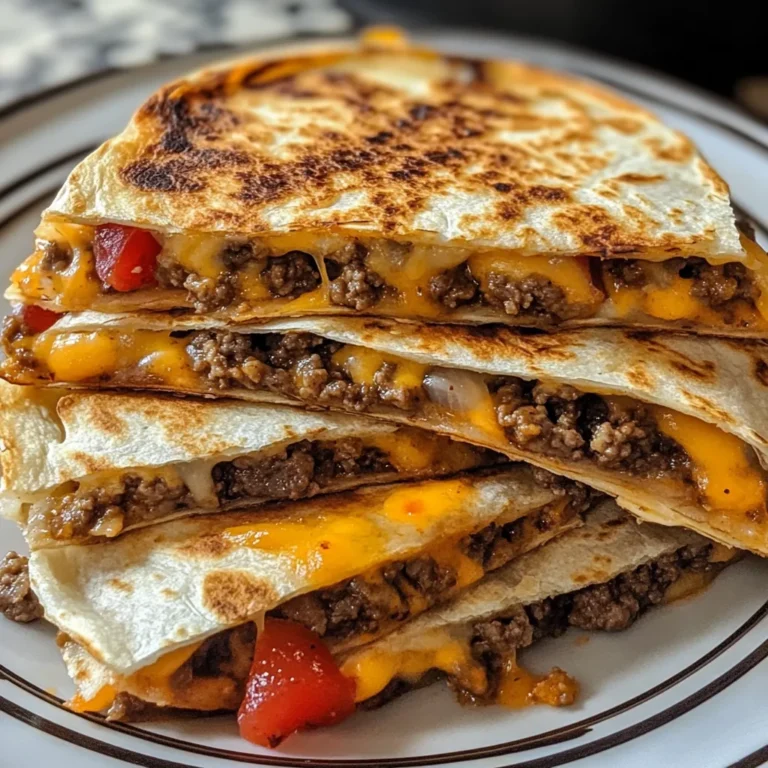
There’s something magical about that first bite into a perfectly crispy chimichanga – that satisfying crunch giving way to savory, seasoned beef and melty cheese. These Crispy Beef and Cheese Chimichangas bring restaurant-quality Mexican food right to your kitchen table, without the need for a deep fryer or professional cooking skills.
I’ve perfected this recipe through countless family dinners, finding that sweet spot where the tortilla gets golden and crispy while the filling stays juicy and flavorful. Whether you’re hosting taco Tuesday or just craving something beyond your usual dinner routine, these chimichangas deliver big flavor with surprisingly little effort.
Why You’ll Love This
- Crispy exterior without deep-frying – we use a simple oven-baking technique with just a light brush of oil
- Make-ahead friendly – prepare the filling up to 2 days before and assemble when ready to bake
- Customizable for picky eaters – easily adjust spice levels or add favorite toppings
- Perfect for meal prep – extras reheat beautifully in the oven or air fryer
- Restaurant-quality results with simple pantry ingredients

Ingredients
- 1 pound lean ground beef
- 1 medium yellow onion, diced
- 3 cloves garlic, minced
- 1 teaspoon ground cumin
- 1 teaspoon chili powder
- Salt and pepper to taste
- 1 cup sharp cheddar cheese, shredded
- 6 large flour tortillas
- Vegetable oil for deep frying
Instructions
- Heat a large skillet over medium heat and sauté the diced onions until they're golden brown and fragrant, about 5-6 minutes.
- Add the minced garlic and ground beef to the skillet. Cook until the beef is browned and cooked through, breaking it apart with a spoon as it cooks.
- Stir in the cumin, chili powder, salt, and pepper until the spices are well distributed and fragrant. Cook for another minute to bloom the spices.
- Remove the skillet from heat and blend in the shredded cheddar cheese, stirring until it's completely melted and incorporated into the beef mixture.
- Briefly warm the tortillas in the microwave for 20-30 seconds or in a dry skillet to make them more pliable for rolling.
- Spoon about ⅓ cup of the beef and cheese mixture onto the center of each tortilla. Roll tightly, tucking in the ends as you go to create a secure package.
- Heat about 2 inches of vegetable oil in a heavy-bottomed pot or deep skillet to 350°F. The oil should be hot enough that a small piece of tortilla sizzles immediately.
- Carefully place the chimichangas seam-side down in the hot oil and fry for 3-4 minutes per side until golden brown and crispy all over.
- Remove the chimichangas and drain on paper towels for a minute. Serve immediately while hot and crispy with salsa, guacamole, or sour cream.
Tips & Variations
- For extra crispy chimichangas, place them on a wire rack over the baking sheet instead of directly on the parchment paper.
- Try using shredded chicken or pork instead of beef for a different flavor profile.
- Add 1/2 cup of cooked rice or beans to the filling to stretch the recipe further.
- Make mini chimichangas using 6-inch tortillas for appetizers or kid-friendly portions.
- For a vegetarian version, substitute the beef with a mixture of black beans, corn, and sautéed bell peppers.
- Air fryer option: Cook at 380°F for 8-10 minutes, flipping halfway through.
Serving Suggestions
Serve these crispy chimichangas on a bed of shredded lettuce with a dollop of sour cream, fresh guacamole, and your favorite salsa. A side of Mexican rice and refried beans completes the restaurant experience. For a fresh contrast, a simple cabbage slaw with lime juice and cilantro makes the perfect accompaniment.
If you’re hosting a gathering, set up a topping bar with diced tomatoes, sliced jalapeños, chopped cilantro, and lime wedges so everyone can customize their chimichanga to taste.
Notes
- Store leftover chimichangas in the refrigerator for up to 3 days. Reheat in a 350°F oven for 10-15 minutes to restore crispiness.
- The filling can be made up to 2 days ahead and stored in the refrigerator.
- For best results, don’t overfill the tortillas – this can cause them to tear or prevent proper crisping.
- You’ll know they’re done when the exterior is golden brown and crispy to the touch.
FAQs
Can I freeze these chimichangas?
Yes! Freeze them before baking, wrapped individually in foil. When ready to eat, unwrap, brush with oil, and bake from frozen at 400°F for about 25-30 minutes.
What’s the difference between a chimichanga and a burrito?
While both start with a filled tortilla, chimichangas are crispy due to being fried or baked, while burritos are typically served soft.
Can I use corn tortillas instead of flour?
Flour tortillas work best for chimichangas as they’re more pliable and seal better. Corn tortillas tend to crack when folded this way.
How can I make these spicier?
Add diced jalapeños to the filling, increase the cayenne pepper, or serve with a spicy salsa or hot sauce on the side.
[recipe_card]