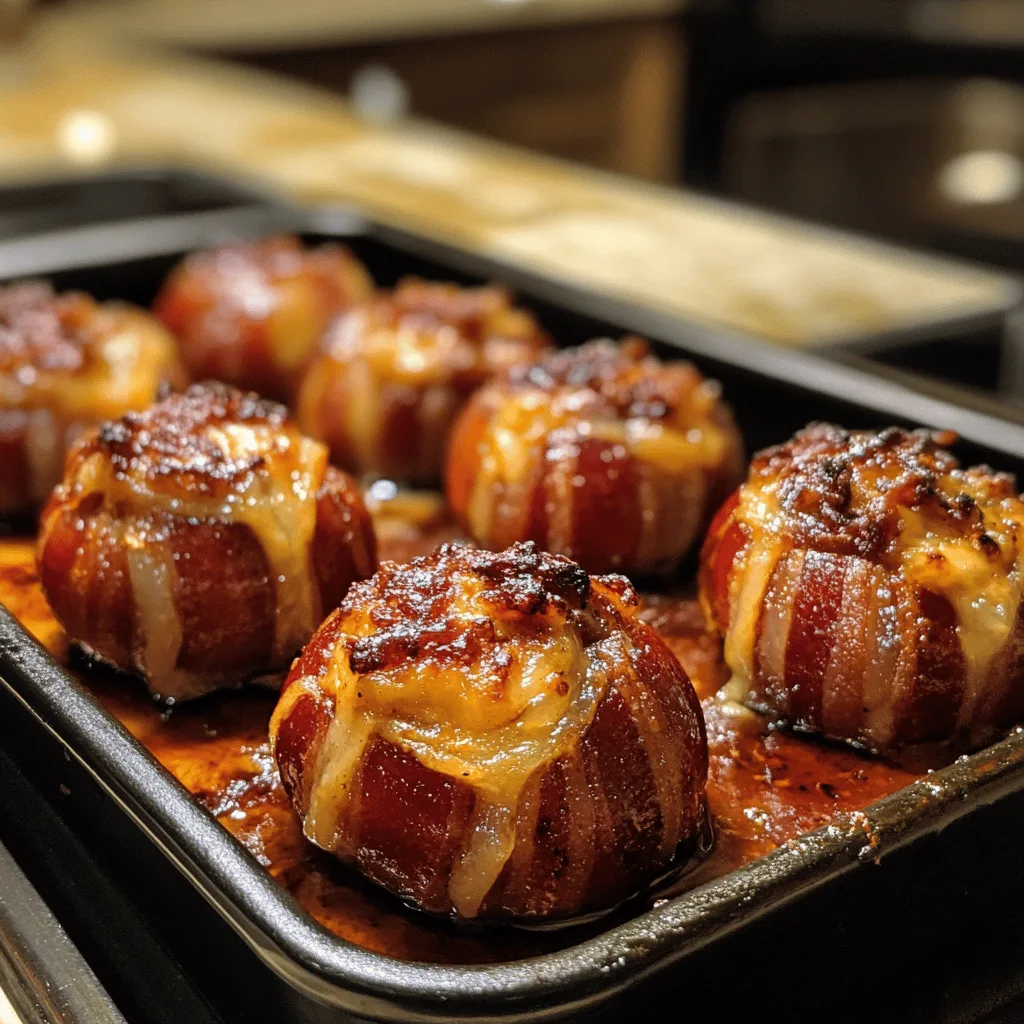
Prepare to meet your new favorite game day indulgence: Cheddar-Stuffed BBQ Bacon Bombs. These irresistible morsels combine the smoky richness of bacon with gooey melted cheddar and a kiss of tangy barbecue sauce, creating bite-sized explosions of flavor that live up to their name.
Perfect for gatherings or as a hearty appetizer, these bacon bombs strike that magical balance between crispy exterior and molten interior. The combination of savory, sweet, and smoky elements makes them utterly addictive – don’t be surprised when your guests request the recipe before they’ve even finished their first bite!
Why You’ll Love This
- Crowd-pleaser: The combination of bacon, cheese, and BBQ sauce is universally loved and guaranteed to impress.
- Make-ahead friendly: Prep these bombs in advance and bake just before serving.
- Customizable: Easily adapt with different cheeses or flavor additions to suit your taste.
- Perfect party food: Bite-sized and hand-held, these are ideal for gatherings without the need for utensils.
- Simple ingredients: Uses pantry staples and common ingredients you likely already have on hand.
Ingredients
- 1 pound ground beef (80/20 recommended for juiciness)
- ½ cup BBQ sauce (your favorite variety)
- ½ cup sharp cheddar cheese, shredded
- 1 teaspoon garlic powder
- 1 teaspoon onion powder
- ½ teaspoon salt
- ¼ teaspoon black pepper
- 12 slices thick-cut bacon
- 12 toothpicks (soaked in water if grilling)
- Additional BBQ sauce for dipping
- Sliced green onions for garnish
- Pickled jalapeño slices
Instructions
- If using an oven, preheat to 375°F (190°C) and line a rimmed baking sheet with parchment paper or aluminum foil for easier cleanup. Place a wire rack on top if you have one, which helps the bacon crisp up all around. If grilling, preheat the grill to medium heat (approximately 375°F) and oil the grates to prevent sticking.
- In a large bowl, combine the ground beef, BBQ sauce, shredded cheddar cheese, garlic powder, onion powder, salt, and black pepper. Using clean hands or a fork, gently mix the ingredients until just combined. Be careful not to overmix, which can make the meatballs tough. The mixture should be well incorporated but still loose and tender.
- Divide the meat mixture into 12 equal portions. A kitchen scale can be helpful for consistency, or simply divide the mixture in half, then each half into 6 equal parts. Roll each portion between your palms to form balls about 1½ inches in diameter. If the mixture is sticking to your hands, you can dampen your hands with a little cold water.
- Take one slice of bacon and wrap it around a meatball, overlapping the bacon slightly as you wrap to ensure complete coverage. Secure the bacon in place with a toothpick, threading it through the end of the bacon and into the meatball. Repeat this process with all remaining meatballs and bacon slices. The toothpick not only holds the bacon in place but also makes these easy to turn during cooking and serve later.
- Place the bacon-wrapped meatballs on the preheated grill over medium heat. Close the lid and cook for about 15-20 minutes, turning the meatballs occasionally with tongs for even cooking. The bacon bombs are done when the bacon is crispy and caramelized, and the internal temperature of the beef reaches 160°F (71°C) when tested with a meat thermometer. If flare-ups occur from dripping bacon fat, move the meatballs to a cooler part of the grill temporarily.
- Place the prepared bacon bombs on the lined baking sheet or wire rack. Bake in the preheated oven for 20-25 minutes, flipping them halfway through the cooking time to ensure the bacon crisps evenly on all sides. They’re done when the bacon is crispy and golden brown, and the internal temperature of the beef reaches 160°F (71°C).
- Once cooked, transfer the bacon bombs to a paper towel-lined plate to absorb any excess grease. Let them rest for about 5 minutes before serving. This brief resting period allows the juices to redistribute throughout the meat, making them juicier when eaten.
- Carefully remove the toothpicks from the bacon bombs before serving (or warn guests if you’re leaving them in for easier handling). Serve hot on a platter, optionally garnished with sliced green onions. You can provide additional BBQ sauce on the side for dipping. These make an excellent appetizer for parties, game days, or as a hearty protein addition to any meal.
Tips & Variations
- Cheese options: Try pepper jack for heat, smoked gouda for extra smokiness, or mozzarella for maximum stretch.
- Spice it up: Add diced jalapeños to the meat mixture or use a spicy BBQ sauce for extra kick.
- Leaner option: Substitute ground turkey or chicken for the beef (add 1 tablespoon of oil to maintain juiciness).
- Air fryer method: Cook at 375°F for about 12-15 minutes for a quicker cooking time and extra crispiness.
- Prevent cheese leakage: Make sure the meat completely seals around the cheese and chill the formed bombs for 15 minutes before baking.
- Make it mini: Create smaller, bite-sized versions using half the meat per bomb for elegant appetizers.
Serving Suggestions
Serve these BBQ Bacon Bombs with additional warm BBQ sauce on the side for dipping. They pair wonderfully with cooling sides like coleslaw, potato salad, or a simple green salad to balance the richness.
For a complete meal, offer them alongside baked beans, corn on the cob, or garlic mashed potatoes. These bombs also make fantastic sliders – just place them between small buns with some lettuce and tomato for a crowd-pleasing mini sandwich.
Notes
- Store leftovers in an airtight container in the refrigerator for up to 3 days.
- To reheat, place in a 350°F oven for 10 minutes or microwave on medium power to prevent the cheese from overheating.
- The bombs are done when they reach an internal temperature of 160°F (71°C).
- If bacon isn’t crisping enough, broil for the final 2-3 minutes, watching carefully to prevent burning.
FAQs
Can I make these ahead of time?
Yes! You can prepare the bombs up to 24 hours in advance. Keep them covered in the refrigerator and add 3-5 minutes to the baking time when cooking from cold.
How do I prevent the cheese from leaking out?
Make sure to completely seal the meat around the cheese cube and chill the formed bombs for 15-30 minutes before baking to help them maintain their shape.
Can I freeze these?
Yes, freeze them uncooked on a baking sheet until solid, then transfer to a freezer bag for up to 3 months. Thaw in the refrigerator before baking or cook from frozen, adding about 10-15 minutes to the cooking time.
What’s the best BBQ sauce to use?
Any BBQ sauce you enjoy will work well. Sweet and smoky varieties complement the bacon and cheese particularly well, but feel free to use your favorite brand or homemade version.
[recipe_card]