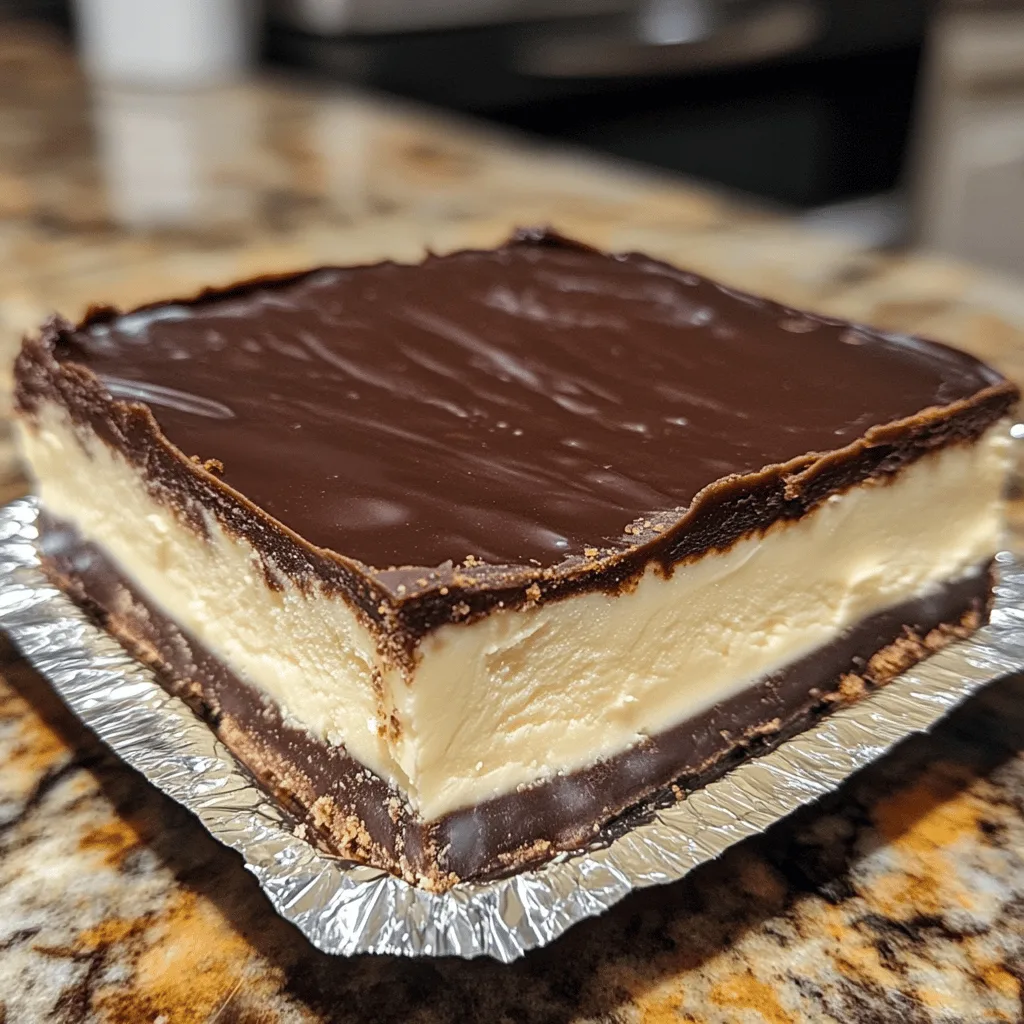
Boston Cream Pie Fudge is the decadent dessert mashup you never knew you needed. This clever treat combines the beloved flavors of classic Boston cream pie—vanilla custard and chocolate glaze—with the rich, melt-in-your-mouth texture of homemade fudge.
Perfect for holiday gift-giving or an impressive dessert table addition, this fudge transforms a traditional New England cake into a portable, bite-sized indulgence that captures all the flavor without the fuss of baking a full cake.
Why You’ll Love This
- No baking required—just a stovetop and refrigerator
- Impressive layered dessert that looks like you spent hours making it
- Perfect make-ahead treat that actually improves with a day of chilling
- Great for gift-giving—can be cut into various sizes
- Combines two beloved desserts into one unique treat
Ingredients
- 2 cups sugar
- 4 oz unsalted butter
- 1/2 cup heavy cream
- 2 cups white chocolate chips
- 7 oz container of marshmallow creme
- 3 tbsp vanilla pudding
- 1/2 tsp vanilla extract
- 3 tbsp unsweetened cocoa powder
- 6 oz semisweet chocolate chips
- 1 tbsp vegetable oil
Instructions
- Line an 8×8 baking dish with parchment paper, leaving the edges hanging off the sides so you can easily lift the fudge out of the dish later. Set aside.
- Add the sugar, butter, and heavy cream to a large saucepan. Bring the mixture to a boil over medium heat.
- Reduce the heat to medium-low and cook for 7 minutes, stirring constantly. To test if it’s ready, drop a small amount into a glass of ice water. If you can grab the ball and it has a fudge-like consistency, it’s perfect.
- Working quickly, remove the pan from heat and immediately add the white chocolate chips. Stir until completely melted and well mixed. Add the marshmallow creme and mix well to combine.
- Add the vanilla pudding and vanilla extract, mixing until combined and smooth. Pour about 2/3 of the fudge into the parchment paper-lined pan.
- Immediately whisk the cocoa powder into the remaining 1/3 of fudge in the pan, mixing until combined. Pour this chocolate mixture on top of the vanilla fudge layer in the pan.
- Use a knife to make swirls through the two layers of fudge, creating a marbled effect.
- Let the fudge cool to room temperature, then cut it into 16 equal squares.
- In a microwave-safe bowl, combine the semisweet chocolate chips and vegetable oil. Microwave in 30-second intervals, stirring after each interval, until the chocolate is melted and smooth.
- Let the melted chocolate cool for 15 minutes. Once cooled, pick up each piece of fudge and dip the top into the chocolate. Place the dipped fudge on parchment paper.
- Allow the chocolate topping to set and harden for about an hour before serving. Enjoy!
Tips & Variations
- For extra authenticity, add 1 teaspoon of rum extract to the custard layer
- Prevent scorching by using a double boiler method instead of direct heat
- If fudge is too soft, increase refrigeration time or place in freezer for 10 minutes before cutting
- For a more pronounced custard flavor, increase pudding mix to 3 tablespoons
- Store in the refrigerator for up to a week, bringing to room temperature for 10 minutes before serving
- For special occasions, dust the top with a little gold edible glitter or sprinkle with chocolate curls
Serving Suggestions
Serve these fudge squares alongside a hot cup of coffee or tea for the perfect afternoon treat. The rich chocolate and creamy vanilla flavors pair beautifully with a cappuccino or latte.
For an elegant dessert platter, arrange fudge squares with fresh berries, particularly strawberries or raspberries, which complement the chocolate and vanilla flavors wonderfully.
Notes
- The fudge will be quite soft at room temperature—store in the refrigerator between servings
- For cleaner cuts, dip your knife in hot water and wipe dry between slices
- Fudge can be frozen for up to 3 months if wrapped tightly in plastic wrap and stored in an airtight container
FAQs
Can I use milk chocolate instead of semi-sweet for the top layer?
Yes! Milk chocolate will create a sweeter, creamier top layer. Just be aware the overall fudge will be sweeter.
Why did my fudge layers separate when I cut it?
This typically happens if one layer was too cold before adding the next. Let each layer cool slightly but remain a bit tacky before adding the next layer.
Can I make this without a candy thermometer?
Absolutely! This fudge recipe doesn’t require precise temperature monitoring, making it perfect for beginners.
How do I know when the fudge is properly set?
The fudge should feel firm to the touch and not leave an indentation when gently pressed. This typically takes at least 2 hours in the refrigerator.
[recipe_card]