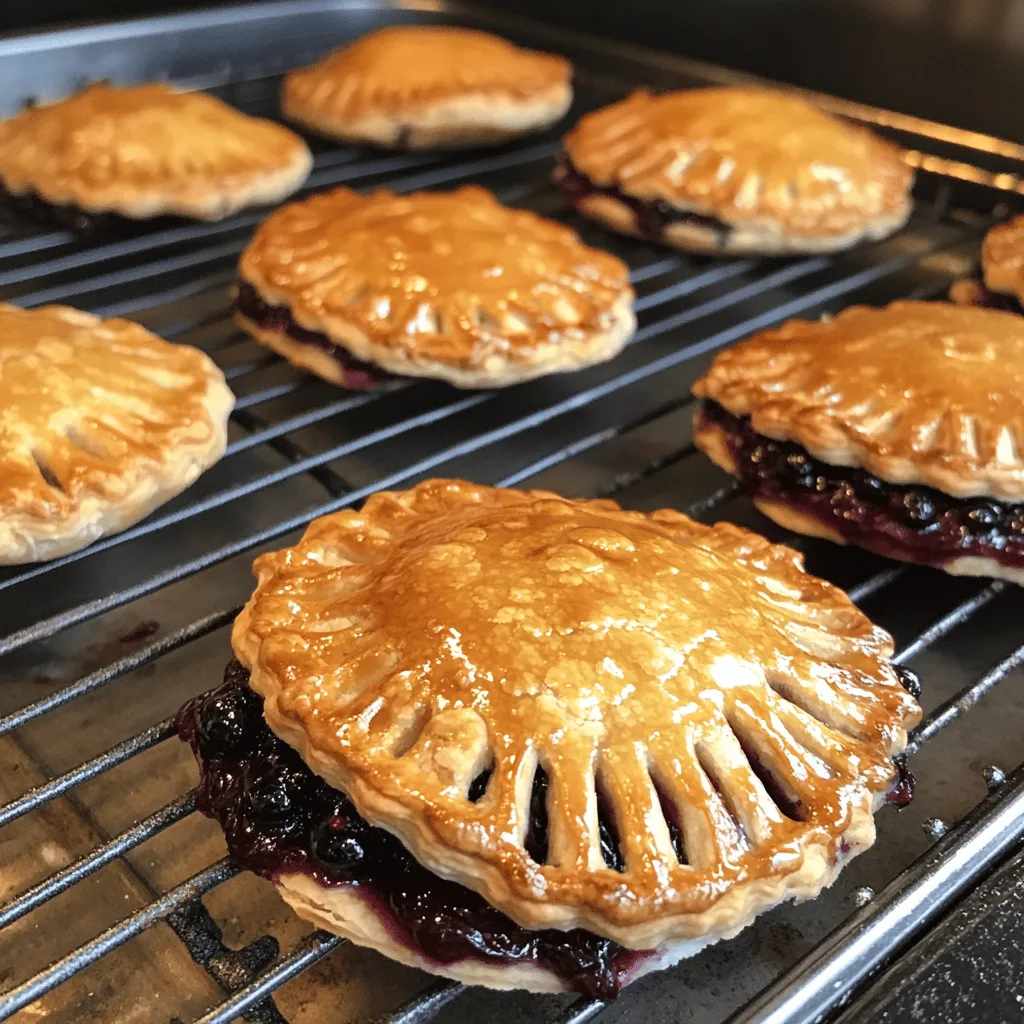
There’s something irresistibly charming about hand pies – those perfect little portable pastries that fit comfortably in your palm. These Blackberry Hand Pies bring together the flaky goodness of buttery pastry with the sweet-tart explosion of juicy blackberries. Each bite delivers that satisfying contrast of crisp, golden crust and jammy fruit filling that makes you close your eyes and savor the moment.
Perfect for summer picnics, afternoon tea, or a casual dessert that doesn’t require plates or forks, these hand pies celebrate blackberries at their peak sweetness. The beauty lies in their simplicity – just a few quality ingredients transformed into something that feels both nostalgic and special.
Why You’ll Love This
- Make-ahead friendly – prepare the dough and filling separately up to 2 days in advance
- Perfectly portable for picnics, lunchboxes, or eating on-the-go without mess
- Customizable with different berries or fruit combinations depending on what’s in season
- Impressive enough for guests but simple enough for baking beginners
- Less intimidating than making a full pie with all the same delicious flavors
Ingredients
- 21 oz. can blackberry pie filling
- Refrigerated pie crust
- 1/2 cup powdered sugar
- 1 teaspoon corn syrup
- 1 tablespoon water
- Vegetable oil for frying
Instructions
- Fill a heavy Dutch oven or heavy bottom pot 4-5 inches deep with vegetable oil. Use an oil or candy thermometer to monitor the temperature. Bring oil to 375°F. If your oil is too cold, the pies will absorb too much oil. If it’s too hot, they will burn.
- Roll out your refrigerated pie crust. Use a 5-6″ bowl to trace a round shape. Cut out with a knife. If your bowl doesn’t fit onto your pie crust 3 times you can use a rolling pin and roll your pie crust out a little more. Cut out 6 rounds total.
- Spoon about 2 tablespoons of blackberry pie filling onto the pie crust round (more or less depending on how much you can fit without it spilling out when sealing.)
- Using your fingers, brush water on the edges of the crust to help seal the edges together. Fold pie round over and crimp the edges to seal pie crust together.
- In a small bowl, mix powdered sugar, corn syrup and water together to make your glaze. Set aside; cover with a damp paper towel to prevent it from drying out while you fry the pies.
- Deep fry one hand pie at a time in the hot oil. Fry them for 2-3 minutes, or until the pie crust is a deep golden brown. Remove from oil and place on a paper towel.
- Using a pastry brush, brush glaze over both sides of hand pie. Place on a baking sheet or cooling rack.
- Repeat the frying and glazing process with the rest of the hand pies. Serve immediately.
Tips & Variations
- Keep all pastry ingredients as cold as possible for the flakiest crust – you can even chill your flour and bowl beforehand
- Swap blackberries for raspberries, blueberries, or a mixed berry combination
- Add a teaspoon of cinnamon or cardamom to the filling for a warming spice note
- For a time-saving shortcut, use store-bought pie dough or puff pastry
- If your blackberries are particularly tart, increase sugar in the filling by 1-2 tablespoons
- Freeze unbaked hand pies on a baking sheet, then transfer to a freezer bag for up to 3 months – bake straight from frozen, adding 5-7 minutes to the baking time
Serving Suggestions
These blackberry hand pies are delicious on their own, but for an extra-special dessert, serve them slightly warm with a scoop of vanilla ice cream or a dollop of lightly sweetened whipped cream. The contrast of cold, creamy dairy against the warm pie is absolutely heavenly.
For a lovely afternoon treat, pair with a cup of Earl Grey tea or coffee. The bergamot notes in Earl Grey particularly complement the bright berry flavors in these hand pies.
Notes
- Store cooled hand pies in an airtight container at room temperature for up to 2 days
- Reheat in a 300°F oven for 5-7 minutes to restore crispness
- The filling should be thick enough to hold together – if it seems too runny after cooking, let it cool completely as it will continue to thicken
- Properly sealed edges are crucial to prevent leakage – don’t skip the fork crimping step!
FAQs
Can I use frozen blackberries instead of fresh?
Yes! No need to thaw them first – use them frozen and add 1-2 extra minutes to the cooking time for the filling. You might need a touch more cornstarch if they release extra liquid.
Why did my hand pies leak during baking?
This usually happens when the edges aren’t sealed well enough or when there’s too much filling. Make sure to crimp firmly with a fork and don’t overfill – about 1 tablespoon of filling per pie is perfect.
Can I make these gluten-free?
Absolutely! Substitute the all-purpose flour with a 1:1 gluten-free baking flour blend. The texture may be slightly different, but they’ll still be delicious.
How do I know when the hand pies are done baking?
Look for a golden-brown color on both the top and bottom of the pies. The crust should feel firm to the touch, and you might see some of the filling bubbling through the vent holes.
[recipe_card]